
Board-certified laboratory technician Laura Sheppard shows how laboratory challenges can be mitigated by a doctor and a qualified lab that work together as a communicative team.

by Laura Sheppard BS, CDT, TE
I’m Laura Sheppard, CDT, TE, and I’ve had the pleasure of helping doctors learn about and practice Dental Sleep Medicine for over 30 years. This series will help you to understand the technical side of laboratory challenges and appliance design, as I shine a light on obstacles that your patient’s dentition, bite or function may present, and provide various design, material or manufacturing remedies.
Segment 1: Perspective, Lab Relations & Requirements
Understanding oral appliances and their design is key to building practice success in DSM. As we know, dentists dedicate their lives to the minutia. They are often immersed in the details of occlusion and alignment. As a certified technician, I also know the importance of a balanced, functional oral environment and the beauty of a dynamic smile. When it comes to Dental Sleep Medicine, it’s important to keep things in perspective during appliance treatment. We recently lost a great friend, teacher, and founding father of DSM, Dr. Alan Lowe, Professor and Chair of Orthodontics at the University of British Columbia. I remember in the early 00’s, there was quite a stir over Dr. Lowe’s presentation of his published studies concluding that ‘all sleep appliances move teeth!’ Many of us still laugh when we recall his response to those who were shocked and disturbed by this revelation. His simple retort to the audience was “Get over it!”
Applied forces (such as repositioning the mandible) against a resisting musculature can stimulate response in adaptable systems, such as the periodontal ligament complex. Tooth movement can be mitigated by good design, whether an appliance is digitally or manually manufactured.
Perspective: The most important take away is that dentists transitioning to dental sleep medicine develop a whole new understanding that supersedes issues of minor tooth movement. They realize that they have the opportunity to save lives!
Find a Qualified Lab
Find a lab that is experienced with various dental sleep appliances and cares about your success. One that understands the treatment as well as the appliances, and one that questions everything. An experienced lab can often anticipate and try to prevent difficulties that may occur based on alignment, draw or function. The most successful doctors welcome calls that ask for verification of a bite or the protrusive midline, or calls about model anomalies. An experienced lab might also question appliance type or design concerns, because no one wins if there are future unwanted side effects in fit or function. And while some doctors and staff assume no communication equals competence, sometimes a lab is ‘conditioned’ to ignore these red flags which only diminishes treatment success. Most of these issues can be mitigated by a doctor and a qualified lab that work together as a communicative team.
Help Your Lab Help You
Distorted Models or Incomplete Scans are the #1 reason cases don’t fit.
- Most common is impression material distortion caused by not being fully cured before removal (follow the instructions and add some buffer time!) or if the material is a low cost or low performance variety.
- For a well-fitting appliance designed to prevent tooth movement, make sure your impression or scan always includes the distal of the terminal molars and at least 2mm of tissue all around.
- Scan issues are most common around the terminal molars. Keep the areas being scanned completely dry.
- Clean up! Saliva, blood, and any debris in the scan area will reflect and interfere with the scanner’s reading.
- Please re-scan if your scan suffers from any of the problems in Figure 2.
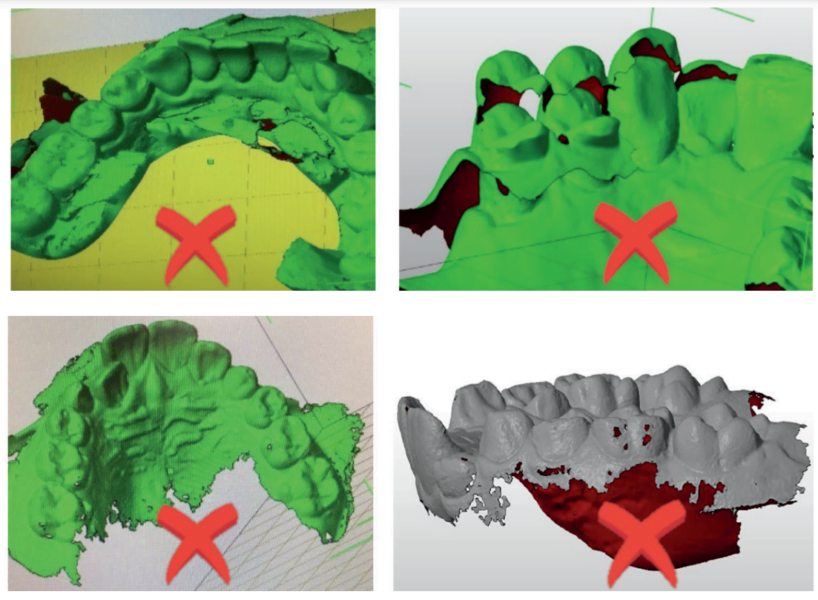
Fill Tool: If scans are missing data or appear fuzzy, use the fill tool to capture missing data. Press and hold on the screen and select fill. Use caution with this, however. You can try to fill too much, and it becomes too much data for scanners to read.
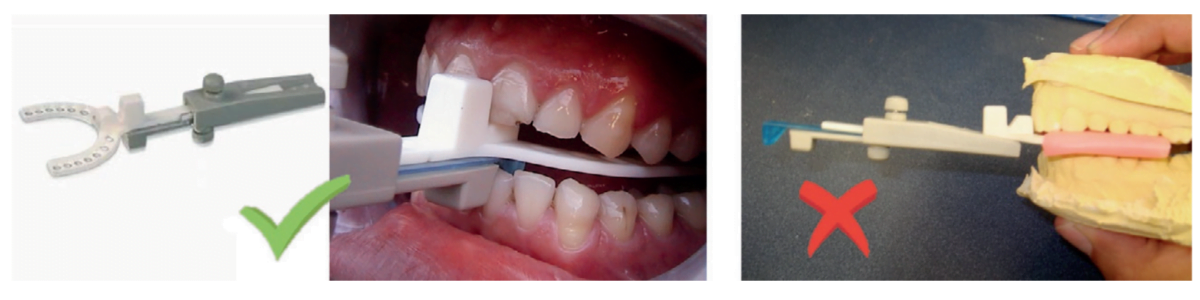
Bite Registrations are the next point of concern.
- Understand the correct use and positioning of your chosen bite gauge.
- Confirm the amount of opening required for the appliance you are considering. Make sure your bite gauge reflects this Most appliances require 4-5mm clearance between the U/L incisal edges.
- Some require only 3mm of clearance – but realize that this means ‘global flat plane’ clearance at the thinnest point.
- Verify and document where midline positions are. Observe where your patient’s dental midline is in:
-
- Closed position – deviation may be functional (dentally-guided)
- Protrusive position (is it repeatable?)
Determine your patient’s protrusive midline by having them translate a few times for you to recognize a constant. Note where the lower dental midline is compared to the upper dental midline, for both positions, and record this on the Lab Rx and in the patient’s chart. Documenting this is very important. First, it’s difficult to visually determine if a patient has incorrectly shifted when taking or scanning a repositioning bite. It’s great to be able to check this before you send the patient home. Second, without recording this in the patient’s chart or on the Rx, it’s hard to answer a midline question when the lab calls to question the bite.

An incorrect shift can often be confused with and accepted as the protrusive-translation position. Without this verification, a ‘connected’ sleep appliance will keep the patient incorrectly shifted all night, every night.
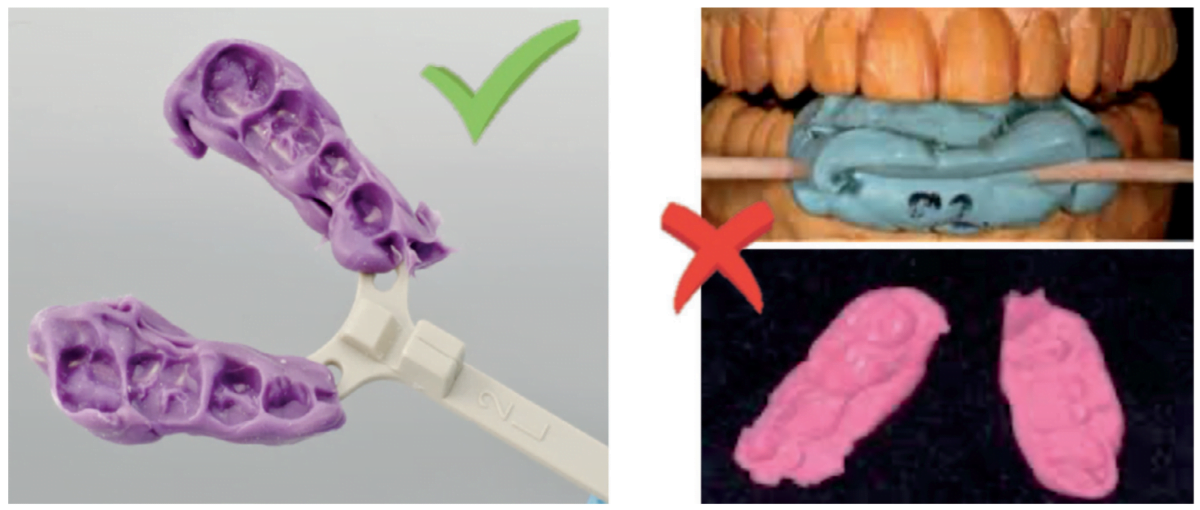
- Manual Repositioning Bites require a stable material. A heavy-body or rapidly-setting PVS bite registration material is best. Not wax or cotton rolls! Also, ensure your bite registration material captures the entire arch length to prevent models from rocking during articulation.
- Scanned Repositioning Bites require any gauge that allows for a stable anterior index, and you only need to scan one side of the arches.
You can also scan a manual bite. Before scanning a manual bite, cut away bite material to expose facial cusp tips for visibility.


Final Tip: Currently Used Appliances can also be helpful to the lab. To a seasoned wearer, a new appliance can be difficult getting used to. And, without known parameters, a lab technician will use ‘standard art’ to manufacture. An easy way to replicate the old appliance is to send your patient’s current appliance to the lab with the case. Request that the appliance be returned as soon as relations are captured. The lab can note and replicate the bite position, the mechanism position, the splints’ borders and contours, tongue space, etc. Even if prescribing a different type of appliance, the lab can try to glean as many ‘known factors’ as possible.


Future installments of this column will include help on Appliance Selection, Designs and Retention Challenges, Clasps & Adjustments, Bite Configurations & Other Design Tips, Design Overload & Liabilities, Benefits & Limitations of Materials, Edentulous Appliances, CAD/CAM, and Regulations.
Laura Sheppard has seen laboratory challenges and triumphs for 40 years. Read more about her journey through the profession. https://dentalsleeppractice.com/guiding-our-way-for-40-years/.
 Laura Sheppard BS, CDT, TE, is a practicing 40 year board-certified dental laboratory technician with her AAS in Dental Technology and BS in Education for Allied Health. Named to the ‘Top 25 Women in Dentistry’ roster by Dental Products Report, Laura has been nationally recognized and published as an expert and educator in the development and implementation of Dental Sleep Medicine and Quality Systems since 1993. As the design collaborator for DSG APM Positioner™ and DSG Remed-eze™, inventor for DSG Relaxer™, and co-inventor of MicrO2™ aka ProSomnus® AI, Laura’s expertise and contributions in dental sleep device invention, design, manufacturing, and regulatory compliance has been utilized to the success of many of today’s advanced sleep devices.